![]() Download in PDF format | more articles..
Download in PDF format | more articles..
One of a set of articles from Ionocom on electronic design topics.
The Contract Design Process
In the contract design process, the client engages the services of a contract design company to perform some or all of the design of a new product or equipment. The client's motivation is usually that they do not have the necessary expertise available in-house, either because they have no R&D facility or because there is no available man-power, and they wish to proceed with developing the new product without having to hire more permanent staff.
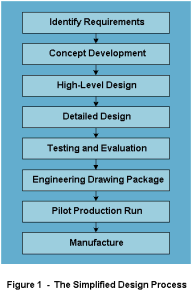
The design process clearly differs from company to company, product to product or equipment to equipment. However, formally or informally, the design process generally follows the sequence of steps shown in Figure 1.
Each step can be iterative and often work on one step causes the designers to go back and refine the previous step. The advantage of following the steps formally is that it reduces the risk of having to make expensive changes late in the process. Each step produces a definite output that can be reviewed before proceeding.
Within each step, different teams (Mechanical, Electronic, Software, Production, Test Engineering, etc.) can work concurrently - reducing the time-to-market.
The contract design process differs only in that some (or all) of the process is contracted out by the client to one or more contract designers or design companies.
Identify Requirements
In most cases the initial identification of requirements is done by the client. However, the client may wish to involve one or more contract designers, other outside consultants (such as marketing experts) or end-users, in refining the requirements.
This phase of the project normally results in a "Design Brief" which details:
- Key attributes of the product/equipment
- Target market
- Business goals (e.g. market share / timing)
- Viability constraints (e.g. Dev. cost / time)
Concept Development
The onus of the Concept Development phase is again on the client and it offers the chance to explore ideas and solutions since changes made at this stage are much less expensive than later in the project. Here, the involvement of contract designers or other outside consultants can be very beneficial since they can suggest ideas and techniques which are new to the client.
The first step is to review and understand the requirements. Whilst it may not be completely true that "a problem properly defined is a problem solved", the opposite is certainly true; "an improperly defined problem yields the wrong solution".
The second, crucial, step is to formulate ideas to meet the requirements. During this stage the developers should be encouraged to consider as many ideas as possible, to be creative, to research the "state of the art" and to be "open-minded".
The third step is to evaluate the various ideas generated and select an approach based on compliance with the requirements, cost-effectiveness, producibility and risk.
The result of the Concept Development phase is a Technical Specification for the product/equipment and a Statement of Work which details non-technical requirements such as Works Cost Price, development constraints (time/cost), deliverables, review schedules etc.
The Statement of Work may also specify development constraints such as preferred design tools, preferred components lists and existing design guidelines, if any, or it may call up other customer documentation which details these. A customer preference clearly defined here can save a lot of aggravation later in the development.
High-Level Design
The high-level design phase firms up the mechanical design, choosing materials, production processes (casting, moulding, etc.) and setting the basic dimensions of the product/equipment and it's sub-components. Depending on the project, the High-Level Design can be carried out by the client, the contract designers or a team from both.
During the high-level design, the key architectural decisions are made; splitting the product functionality between mechanical, electronic and software/firmware functions. The design is partitioned into physical and logical blocks and the specifications for these blocks (and their interactions) defined.
The outputs of the High-Level Design Phase are:
- Outline Mechanical Design
- Functional Partitioning
- Hardware Module Specifications
- Software/Firmware Module Specifications
The end of the High-Level Design marks a major milestone since it is generally the point at which extra staff and resources are allocated to the project. The quality and thoroughness of the High-Level Design directly affects the efficiency (and cost) of the remaining phases.
Detailed Design
During the Detailed Design phase, the design is actually implemented. This is usually the most labour-intensive part of the development and it is here especially that different teams can work in parallel to reduce the overall time-scale.
The mechanical design is refined, piece parts drawn, suppliers identified and prototype hardware assembled. The electronic modules are designed and, if necessary, bread-boarded. Then PCBs are laid-out and prototypes constructed. Any firmware is designed and coded.
During the this phase, it may be necessary to design and construct Engineering Test Jigs to allow part, or all, of the design to be tested.
The end result of the Detailed Design phase will be one or more prototypes ready for evaluation.
Testing and Evaluation
During the Testing and Evaluation phase, the product/equipment is tested to ensure that it meets the Technical Specifications and evaluated to ensure that it meets the non-technical goals (Ergonomics, Works Cost Price, Producibility etc.). The amount of Testing and Evaluation required depends on the type of product and the target market. Clearly, a high-volume consumer product would be expected to require considerably more evaluation than a "one-off" test instrument.
It may also be necessary to evaluate the product for compliance with national or international standards for safety, EMC (electro-magnetic compatibility) or radio type approval. This is often known as "Pre-compliance Testing".
Depending on the results of the testing and evaluation, further product refinement and further prototypes may be necessary before going forward to the Production phases of the project.
Engineering Drawing Package
Once the design has been accepted, it is necessary to bring together the various elements of the Engineering Drawing Package.
This involves producing Product Structures and Bills of Materials, based on the existing schematics and piece-part drawings, as well as identifying any special processes or tooling required. As well as collating the existing drawings and artworks, a set of manufacturing Assembly Drawings is required showing how each assembly is manufactured and how the assemblies are put together to form the final product.
Usually, a set of Production Test Specifications will be developed detailing how each assembly is inspected/tested. Often these result in special Production Test Jigs having to be developed.
Pilot Production Run
The Pilot Production Run allows the Production Package, the Production Test Jigs, the product itself and the production process to be tried out in a limited volume production run. During this phase the production company will prepare and test its Production Drawings.
Where regulatory testing (e.g. Type Approval) of the product is required, it is normal to test units from the Pilot Production Run.
Manufacture
At last, all the work comes to fruition and the product enters volume production!
Ionocom
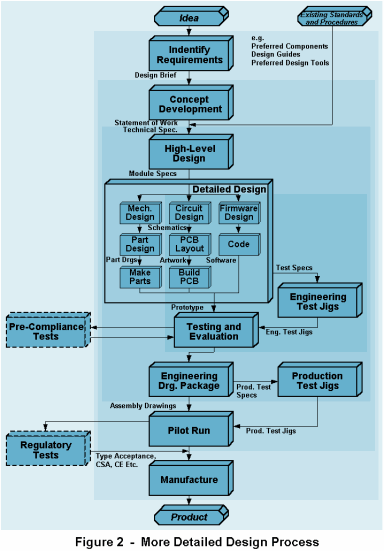
It is useful to show how a contract design company such as Ionocom fits into the overall project. Figure 2 shows Ionocom's potential involvement using darker colours to show the most likely involvement. Whilst it is possible for Ionocom to take on the entire product development, it is more likely that the client would wish to conduct the initial Requirements part of the project and to manage (or conduct) manufacturing.
Similarly, clients may wish to see through the Concept Development (possibly with the involvement of Ionocom) and some clients may wish to oversee the Pilot Production Run.
Ionocom's most likely involvement would be in the High-Level Design, Detailed Design and Engineering Drawing Package phases.
About the Author
Nick Massey is a principal of Ionocom Communications Inc., Vancouver, BC.
He has worked in electronic product design since 1979, first in Reading, England, and lately in Vancouver, BC, Canada.
He can be reached by email at nick@ionocom.com.